Isadora’s powerful scene system includes a useful feature for operating multiple scenes simultaneously: the Activate Scene, Deactivate Scene, and Activate Scene Amount actors.
These actors are exceptionally useful when you need a specific video or audio asset to play consistently across several scenes without interruption. It’s also a great method to facilitate unbroken communication between sensor data and generated effects (such as ArtNet communications or Kinect sensor data) as you move from one scene to the next. Finally, activating and deactivating scenes is an effective way for interactive pieces to combine complex effects and User Actors on demand without taxing your computer’s resources. Instead of building a complex patch with myriad User Actors in a single scene, each component can be moved into its own scene and activated only when needed by the project.
How does it work? The Activate Scene actor allows you to activate a “secondary” scene in addition to the current “primary" scene. This secondary scene remains active until it is deactivated using a Deactivate Scene actor. Additionally, the Activate Scene Amount actor can both activate and deactivate scenes. Optionally, it can also automatically deactivate scenes it activated when you leave the scene that contains that Activate Scene Amount actor.
The primary scene is illuminated in the Scene List in dark blue with a green line beneath it; other active secondary scenes are illuminated in a light blue.

In the above image, “Q2: VIDEO 1” is the primary scene, and “Q1: AUDIO” and “Q4: VIDEO 3” are the active secondary scenes. “Q3: VIDEO 2” and “Q5: OUT” are not active.
Isadora does not limit how many secondary scenes you can have active at a time, but each active scene uses computer resources as normal.
You cannot activate the current primary scene, however, it is possible to deactivate it. Activating a scene that is already active does not reset the scene, nor does it activate a duplicate.
Organizing the Scene List
Scenes are either the primary scene, a secondary scene, or not active. An activated "secondary” scene which later becomes the “primary" scene won’t remain active after leaving it. The scene's status as a “secondary" activated scene disappears once it becomes the “primary” scene, and afterwards it behaves just like a normal scene.
For this reason, it’s important to ensure that your Scene List is carefully organized so that the project will not accidentally transition into a scene that you want to remain active. You also want to avoid accidentally activating or deactivating the wrong scene because scenes have been added or removed since you told an Activate Scene, Deactivate Scene, or Activate Scene Amount actor which scene to target. As a best practice, we recommend placing scenes you plan to activate or deactivate at the beginning of the Scene List, followed by a blackout scene and then a “pre-show” or opening state scene. When you operate your project, you'll manually skip past these scenes prior to the start of the performance as part of your pre-show preparation. Ensuring that your secondary scenes remain in fixed position in the Scene List is essential. When running the show, you want to ensure that there is no chance an operator will transition into your secondary scenes or accidentally activate the wrong one(s). Keeping the same absolute position for these background scenes in the Scene List by putting them at the beginning of your file, as opposed to placing the Activated scenes at the end (or in the middle) of your project, prevents you from having to update individual Activate Scene, Deactivate Scene, and/or Activate Scene Amount actors if you add or remove scenes while creating or modifying an Isadora file.
Therefore, planning a project using Activate Scene, Deactivate Scene, and/or Activate Scene Amount actors requires some careful thinking ahead. In this example, we’ll show you how to think about organizing your scenes while we learn how to use the Activate Scene and Deactivate Scene actors.
Try it!
Suppose we have a single piece of music we wish to play, but the video changes between several images. We want to transition through several video cues, but we also want the audio track to proceed unbroken. We can’t use a pre-recorded sequence because the exact timing of the video transitions needs to be manually triggered, so the music must continue separately. This is a relatively common scenario in many media-heavy works, and the Activate Scene actor is the perfect solution.
To begin, you’ll need the following media files from your own collection:
- An audio file in .mp3 or .wav format.
- A few pictures or movie files, at least four or more if desired.
- [Optional] An image or video file with an alpha channel (such as a transparent .png)
Step-by-Step Guide
- Start a new Isadora project and import the media you selected.
- We’ll use the first scene to play the audio file. Name the scene “AUDIO”.
- Place a Movie Player actor (if you are using an .mp3 file) or a Sound Player actor (if you are using a .wav file) in the scene. Set this actor to play your audio file on a loop. Don’t set a fade out time for this scene.
- If you are using a Sound Player, don’t forget to use an Enter Scene Trigger actor connected to the ‘start’ trigger input to initialize playback.
- Create a new scene after the first scene. Name the scene “PRESHOW”, but leave the scene otherwise empty to create a blackout cue. Set a 2-3 fade out time for this scene.
- Create another new scene. Name the scene “VIDEO 1”. Add a Movie Player or Picture Player connected to a Projector actor for output. Set a 2-3 second fade out time for this scene.
- Repeat Step 5 to create two or three more scenes. Name these scenes "VIDEO 2", "VIDEO 3", and so on. Be sure to play a different image or video in each scene!
- Finally, create a scene called “OUT”. Leave this scene empty for now.
At this point, we’ve created a simple set of Isadora cues. Your Scene List should look something like this:

Double-check that you can transition from one scene to the next using the space bar as normal. You should have a scene with music, followed by a blackout scene, followed by a transition between a few different images, ending with another blackout.
Next, we will use the Activate Scene actor to start the audio file playback we set up in the "AUDIO" scene. By placing the Enter Scene Trigger actor connected to an Activate Scene actor in the VIDEO 1 scene, the audio will continue to play unbroken as we transition across the "VIDEO" scenes. Finally, we’ll use the Deactivate Scene actor to fade the audio out in the scene called "OUT". Here’s how to do it:
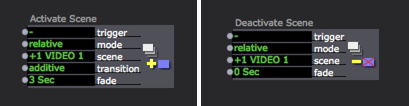
- Go to the "VIDEO 1" scene. And add an Activate Scene actor:

- The Activate Scene actor requires us to plug in a few pieces of information in order to activate the right scene.
- First, we need to connect some kind of input to the ‘trigger’ input. This will be the command that actually causes the scene to activate. This is best done with either the Keyboard Watcher (for when you want to manually activate a scene) or even better, with the Enter Scene Trigger actor, which causes the secondary scene to activate alongside the primary scene. In this example, let’s add an Enter Scene Trigger actor, then connect its ‘trigger’ output to the ‘trigger’ input of the Activate Scene actor as shown below.
- Now we need to specify which secondary scene the actor will activate when triggered. This is defined using both the ‘mode’ and ‘scene’ input properties. First, the ‘mode’ input is set to either ‘relative’ or ‘absolute’, and defines how the value in the ‘scene’ input property behaves.
- When the ‘mode’ input is set to ‘relative’, the number of the current scene is added to the value in the ‘scene’ input property to determine which scene is activated. Thus, if the value in the ‘scene’ input is ‘+1’, the Activate Scene actor would activate the next scene in the Scene List.
- When the ‘mode’ input is set to ‘absolute’, the value of the ‘scene’ input determines which scene is activated directly, thus ‘1’ activates the first scene in the Scene List, ‘2’ activates the second scene, and so on.
- In this example, we know we want to activate the "AUDIO" scene, which is the first scene in our project. Set the ‘mode’ input to ‘absolute’ and the ‘scene’ input to ‘1’. Placing activated scenes at the start of the project makes this method easy to use.
- The ‘transition’ input determines the layering and blend mode for the new scene:
- ‘above’ renders the secondary scene on top of the primary scene using a transparent blend mode that will obscure the underlying primary scene as it fades in.
- ‘additive’ will render the new scene with an additive blend similar to the ‘additive’ mode of the Projector actor.
- Since we are only playing audio in the secondary scene, leave the ‘transition’ input set to ‘additive’ for now.
- Finally, the ‘fade’ input property defines the fade-in time, in seconds, for the activated scene. Set this as desired. Common fade times to use are between 1 to 3 seconds, but that may vary depending on your use case and/or the audio file you are using.
- Once complete, our "VIDEO 1" scene should look something like this:

- Now, skip ahead to the scene we created earlier called "OUT". This was an empty scene before, but now we are going to add the Deactivate Scene actor to it.

- The ‘trigger’, ‘mode’, ‘scene’, and ‘fade’ properties behave identically to the Activate Scene actor, except the actor is used to deactivate a previously activated scene.
NOTE: The Deactivate Scene actor isn’t “intelligent”. It can’t detect active scenes automatically, nor does it actually matter if the scene it’s deactivating is active or not. Thus, you need to carefully plan ahead and carefully instruct Deactivate Scene actors appropriately. Otherwise, activated scenes may simply remain on indefinitely.
- As before, add an Enter Scene Trigger actor connected to the ‘trigger’ input of the Deactivate Scene actor.
- Set the ‘mode’ input to ‘absolute’ and the ‘scene’ input to ‘1’ to correctly deactivate the "AUDIO" scene.
- Set the ‘fade’ input property to any value you like. (3 seconds is usually appropriate.)
- Your "OUT" scene should now look like this:

Putting it Together
Starting at the PRESHOW scene, run through your project. You’ll notice that when you go into the "VIDEO 1" scene, the "AUDIO" scene activates as well.
Press the space bar to transition from one scene to the next. As you do, the "AUDIO" scene remains active and the music continues to play, but the video images change on-demand.

Once you reach the "OUT" scene, the "AUDIO" scene fades out:

Cross-Scene Communication
An activated secondary scene is “active” in every respect. Control, communication, and mouse and keyboard actors are all fully functional in an activated scene and work normally. However, the Scene Editor only displays the primary scene, and the Control Panel only displays controls associated with the primary scene as well.
We can also communicate between two active scenes using the Broadcaster actor (to send information) and the Listener actor (to receive it). This is useful if you want to alter the actor properties in a secondary scene, or to use data collected in the secondary scene to power effects or manipulate actors in the primary scene.

Try it
- Go back to the "AUDIO" scene.
- Add a Listener actor to the scene and leave the ‘channel’ input property set to ‘1’.
NOTE: All Listener and Broadcaster actors you want to share information between must be set to the same ‘channel’. Remember to use different ‘channel’ numbers if you are working with multiple different input/output pairings at once. For advanced users with very complex projects, it can also be a good idea to keep a User Actor in the document toolbox that contains a Comment actor listing the Broadcaster/Listener channels you've used in your project, and what you've used them for.
- Connect the ‘value’ output property of the Listener actor to the ‘volume’ input property on the Movie Player actor.

- Now, go to the "VIDEO 1" scene. Notice that the "AUDIO" scene is activated, and you hear the music playing.
- Now, add a Broadcaster actor to the "VIDEO 1" scene.
- You’ll notice that immediately, the music suddenly stops. It actually hasn’t, we’ve just set the volume back down to 0 because that is the default ‘value’ for a new Broadcaster actor.
- Change the ‘value’ input property of the Broadcaster actor to '100' and you’ll hear the music again! Try a few different values from 0 to 100, and notice that you can now manipulate the volume of the "AUDIO" scene from the "VIDEO 1" scene!
NOTE: The Broadcaster actor only transmits new data when the value is updated. If you wanted to alter the volume as you move from scene to scene, you'd need to use a Trigger Value and Enter Scene Triggers to pass new values to the Broadcaster. You must also set the ‘initialize’ function of the Broadcaster actor's ‘value’ input property to a value that is not equal to the value being received from the Trigger Value actor. Simply placing a Broadcaster actor in each scene with the new values won’t pass the new values.
- This will create a ‘hard cut’ in the values. Experiment using other actors, such as the Envelope Generator, to create fades or smoother transitions.
- Try adding other Broadcasters in later scenes to change the volume as you move from scene to scene.
- Experiment by using multiple Broadcasters and Listeners connected to other properties. Remember to use different ‘channel’ numbers if you are working with multiple different input/output pairings at once.